Showing posts with label recipe. Show all posts

Sunday, 7 September 2014

RECIPE | Homemade Raw Almond Milk


Making your own almond milk is easy and delicious!

My hubby hates almond milk (store bought) but loves this version! It is sure to win over some people that don't normally like it. 

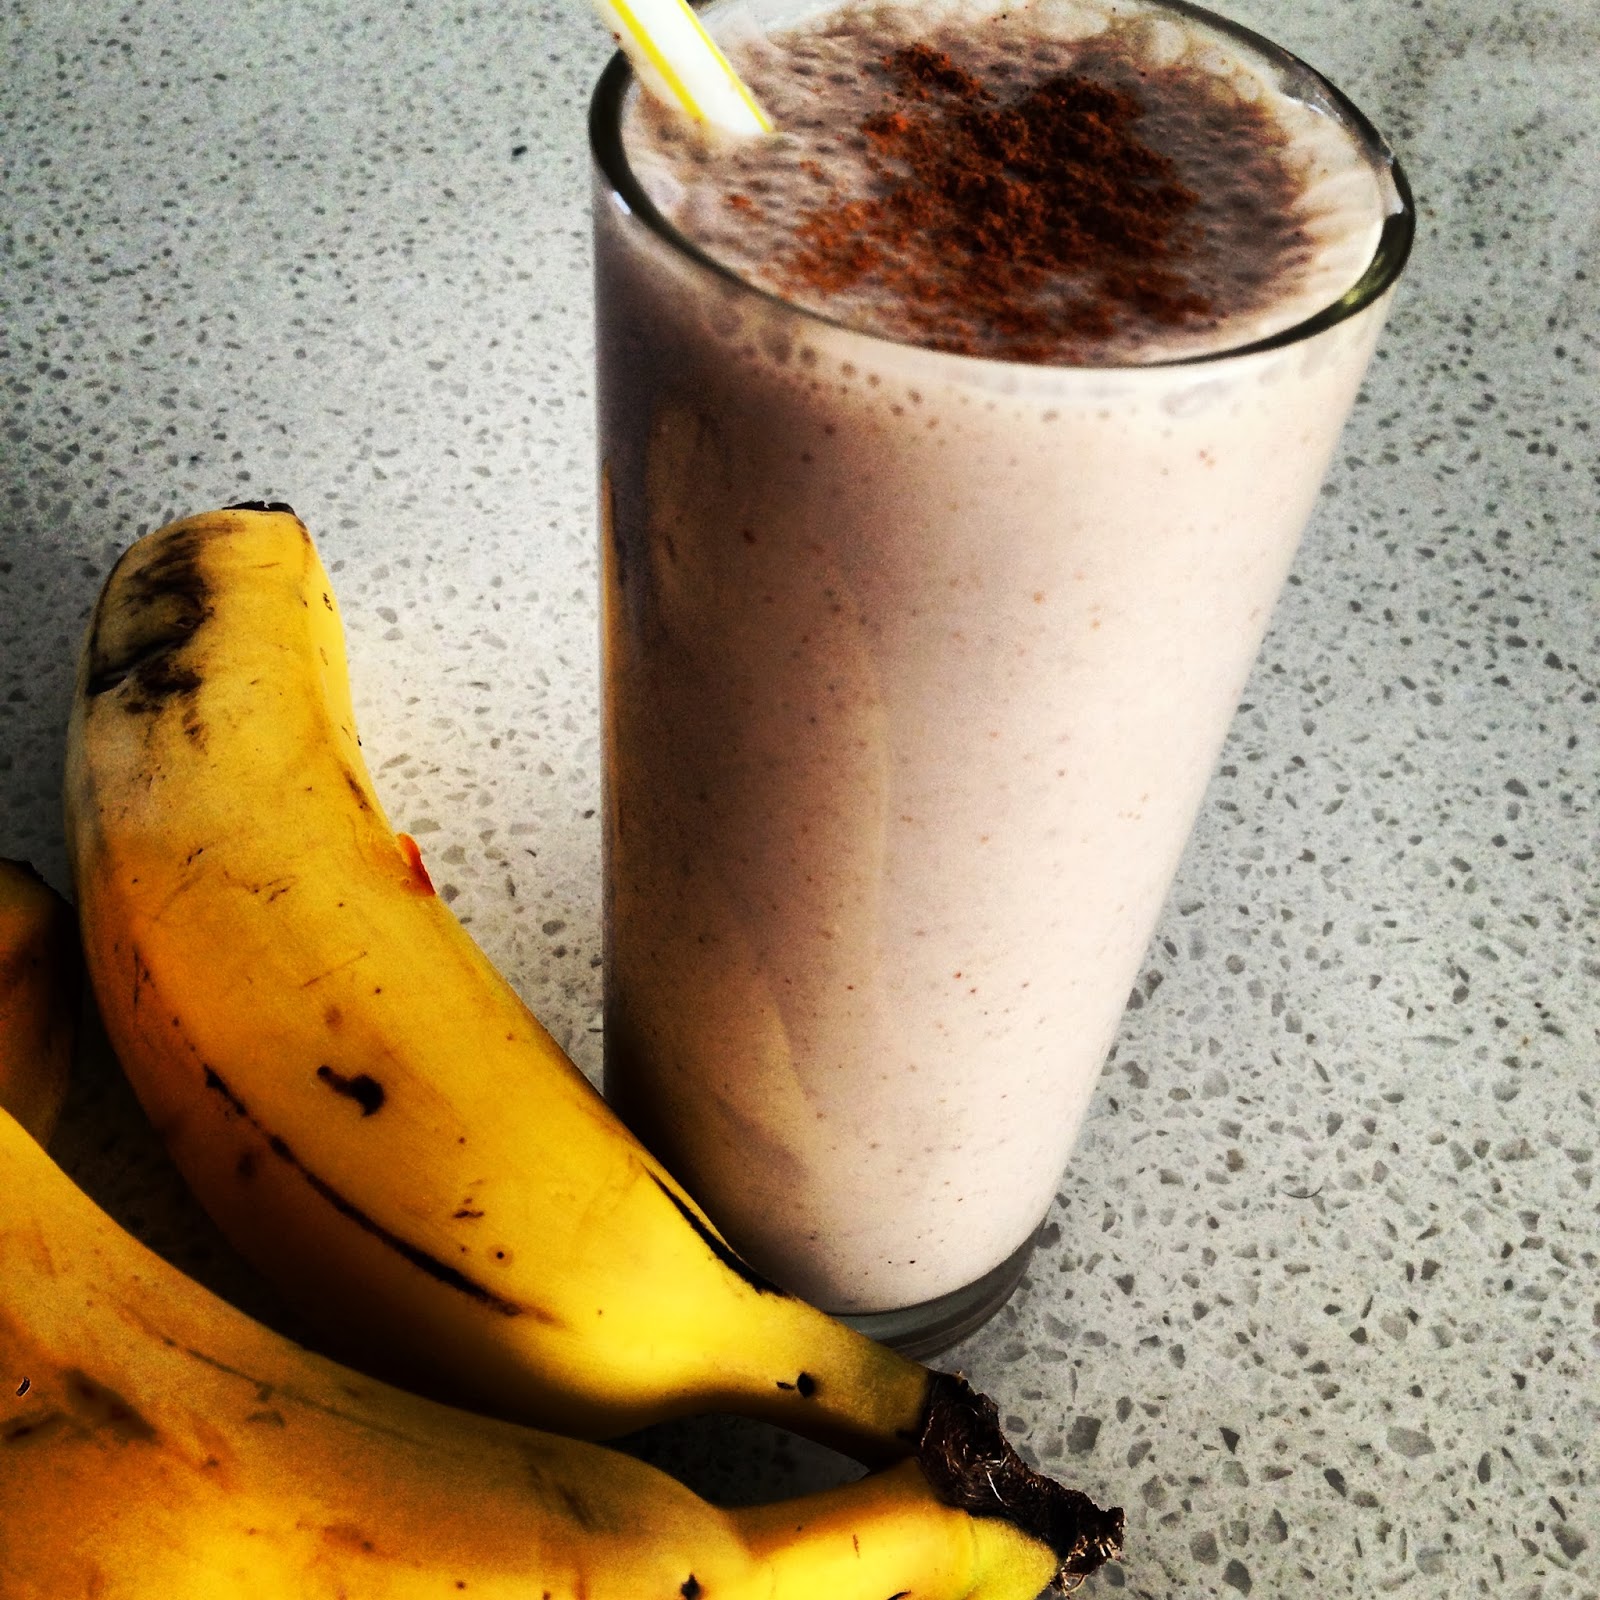
It turns out smooth & creamy just like regular milk but much tastier!

When I look on the cartons of store bought almond milk, most brands use about 1%-2% almonds in the whole carton, so you are basically paying for water with other nasty ingredients. 

I add no sugar to the mix, you can add maple syrup as I have listed below or could try stevia or rice malt syrup.

The below quantity makes roughly 1.5 litres (depends on how much milk you squeeze out at the end!)

Ingredients:
2 cups raw almonds
5 cups filtered water (plus more to soak almonds)
2 tablespoons pure maple syrup
1 teaspoon ground cinnamon 
1 teaspoon pure vanilla extract
A pinch of good quality sea salt
+ a cheese cloth or muslin wrap (to strain the milk)
+ strainer
+ bottles to store your milk in

Directions:
Soak almonds over night, covered in water and a pinch of salt. This will soften them and make them sprout.

Once ready, rinse the almonds and throw away the water that you used to soak them.

Into a blender, put all of the almonds with 2 cups of filtered water and a mix until it forms a smooth paste. 

Once smooth, add rest of water and all remaining ingredients and blend until very smooth (I leave the blender on for a couple of minutes, how long you will need to blend will depend on how strong your blender is).

Now you need to strain the milk, if you leave it as is, it will be powdery from the skin of the almonds and not a very nice consistency.

Put a couple of layers of your cheese cloth or muslin wrap over a strainer and strain the milk into a bowl, then be sure to squeeze any excess milk out of the cloth.

Then pour into clean bottles (I use a funnel to get it in without any mess).

You can keep it in the fridge for up to 4 days.

You will be left with almond meal in your cloth. You can dry this out in a very low oven and store it to replace store bought almond meal or you can keep it "wet" in the fridge for a few days and use it in the same way. 

Hope you enjoy this recipe as much as I do!

Bee xx


Thursday, 3 April 2014

"No Nuts Balls" Raw Decadent Chocolate Bliss Balls (Nut Free, Gluten Free, Dairy Free, Refined Sugar Free, Easy as can be!)

These "No Nuts Ball's" are so delicious! I love how a raw healthy treat can look so cheeky!

This is a really simple recipe which is great to whip up if you have a chocolate craving or if you want to have a little treat for guests post dinner with a cup of tea. As they are nut free they also make a great lunch box treat which is what I have made them for tonight! (Even though I may have eaten a couple... I have to test them first right!?).


Ingredients:
1 cup organic shredded coconut, reserving a little to coat balls at the end
8 medijool dates (seeds removed)
2 tbs chia seeds
1 tablespoon coconut oil
1 heaped tablespoon raw cacao powder
a splash of chilled water if you need it

Directions:
Place all of the ingredients in the bowl of a food processor and blitz until combined and smooth. If needed add the splash of chilled water.
Then roll into balls, coat in coconut and refrigerate overnight (if you have time, otherwise a couple of hours is fine) and in the morning they will be like beautiful decadent chocolate truffles.

Enjoy!

Bee xx


Friday, 14 March 2014

Paleo Crumbed Chicken Caeser Salad with Creamy Tahini Dressing

This is a great week night meal, it's very filling and you can make extra to take to work with you the next day for lunch, or even use the leftover chicken for sandwiches.

Serves 2 as a main meal, with leftovers!

Paleo Crumbed Chicken

Ingredients
2 organic, free range chicken breasts, each breast sliced long way to make about 3 pieces per breast
2 tablespoons coconut flour (or regular flour)
2 eggs, whisked
1 teaspoon of paprika & 1 teaspoon garlic powder
1/2 cup almond flour(you may need a little more or less)
Any other herbs you have on hand, I used oregano & thyme
2-3 tablespoons coconut oil for frying

Directions
Coat chicken in flour, paprika, garlic powder & herbs
Dip the chicken into the whisked eggs
Dip the "eggy" chicken into almond flour to coat
Heat fry pan to medium-high heat
Cook chicken a few minutes each side until cooked through
Set aside, keep warm and get cracking on the other items

Other salad ingredients
1 head cos lettuce, washed & chopped
5 eggs, boiled
5-6 rashers thin bacon pan-fried until crispy
2 tablespoons of sunflowers seeds or any other seeds you have in your pantry for some crunch

Directions
Layer all ingredients together & top with sliced crumbed chicken!

Creamy Tahini Dressing

This is a delicious versatile dressing, similar in taste & texture to hummus

Ingredients
Juice of half a lemon
2 tablespoons natural yoghurt
1 tablespoon olive oil
2 tablespoon tahini ( I used unhulled, it is much stronger so if your not that keen on the taste you should use the hulled tahini)
1 small clove garlic, minced (very fine)
A pinch of sea/rock salt

Directions
Whisk or blend all ingredients until delicious & creamy
Drizzle over your salad or serve on the side for dipping


Bee xx

Wednesday, 5 February 2014

RECIPE | Raspberry & Coconut Cream Love Bites (Paleo, Vegan, Gluten Free)

Just in time for Valentines Day! Why not make your loved one a treat, or just make some for yourself! These are a great little refreshing treat, they need to be eaten semi-frozen so great to have during summer time :)


Raspberry & Coconut Cream Layer Ingredients:
2 cups frozen raspberry (you could use strawberries instead)
1 cup shredded coconut
1/3 cup coconut cream
1/3 cup coconut oil
3 tablespoons real maple syrup or honey
1 teaspoon vanilla bean paste
2 tablespoons coconut nectar (optional)

Chocolate Icing Layer Ingredients:
1/3 cups coconut oil
2 tablespoons raw cacao powder
1 teaspoon vanilla bean paste
3 tablespoons real maple syrup or honey

Directions

  • Line a small square cake tin with baking paper (you need a small one or it will spread out too far in a big one, mine was about 20cm x 20cm)
  • Blend all of the raspberry & coconut cream ingredients together until smooth, you may need to stop the blender to mix them up a little half way through depending on what time of blender you have
  • Fill lined tray with blended mix and freeze for a couple of hours or until almost set


Chocolate Layer

  • Melt together all chocolate icing ingredients in a small saucepan over very low heat
  • Pour over raspberry layer and put back in freezer for around 20 minutes


It should be ready now to take out a slice up & enjoy!! You may need to wait a couple of minutes after you take it out of the freezer to slice up.

Hope you enjoy this recipe! 

If you do, please hit one of the share buttons below to spread the love! 

Bee xx

Thursday, 9 January 2014

RECIPE | Raspberry & Coconut Smoothie Bowl

This is a super simple recipe for a deliciously refreshing bowl of goodness. Perfect for a hot summer day. I've been eating these for breakfast, lunch & dessert! The ingredients can be mixed and matched with whatever you have in the fridge but this combination is one of my favourites!


Ingredients:
1 frozen banana
1 cup frozen raspberries
1/2 of a mango 
1/2 cup ice
1/2 cup coconut milk or I use coco-quench by pure harvest
1 tablespoon raw honey
1 /2 teaspoon maca powder
2 tablespoons shredded coconut
1 teaspoon chia

Directions:
Blend all of the ingredients until smooth. If you don't have a great blender, it's best to add a little bit of each ingredient a little at a time to help it blend better. 

Easy peasy!

Enjoy! 

Bee xx

Sunday, 5 January 2014

A Couple DEEEELICIOUS Smoothie Recipes

How good are smoothies in summer?! You can pack them full of anything you like to give your body exactly what it needs. They are such an easy way to get extra fruit & vegetables into your diet.

There are many different variations to smoothies that you can make and if you are a regular smoothie maker you have probably mixed and matched many different flavours. For the newbies, it's nice to have a couple of recipes to follow.

Below are a couple of my favourite summer smoothie recipes. So refreshing & delicious!

Green Tropical Smoothie
1 cup of coconut milk ( I use coco quench by Pure Harvest instead of canned coconut milk, it is a milk blend of coconut milk and brown rice milk, you can find it in coles and health food stores). If you can't find coco quench, you could use half a can of coconut milk with half a glass of water, or almond or rice milk).
1 frozen banana (the frozen part makes all the difference!)
1 mango, all of the flesh
1 big handful of kale (stems removed)

Blend all until smooth. You may need to add a little extra water to get the right consistency.

I like to have this one for breakfast sometimes instead of the usual green smoothie (Bee's Glorious Green Smoothie - recipe for that one here).


Summer Pink Goddess Smoothie
1 cup of coconut milk - Coco Quench (see my notes in the above recipe regarding the milk)
1 cup frozen raspberries
1 cup chopped cold watermelon

Blend all until smooth. You may need to add a little extra water to get the right consistency.

This is so refreshing in summer. You could even use it as a base to make popsicles, the kids would love it!


Let me know what is your favourite combination in the comments section below.

Enjoy! 

Bee xx

Sunday, 1 December 2013

RECIPE | Healthy Chicken Schnitzel (Paleo, Gluten Free, Kid-Friendly!)

(In my best German accent) Who doesn't love a good schnitzel? 

This is an easy, healthy alternative to the popular fried chicken schnitzel. It still contains oil but not nearly as much and you can either make it with coconut oil or rice bran oil depending on your thoughts on those oils. My son's favourite food is schnitzel and he loves this alternative :)

Ingredients:
2 organic, free range chicken breasts, sliced super thin
3 organic, free range eggs, whisked
Approx half a cup of almond meal or LSA
1/4 cup coconut flour or as much as needed 
Handful of parsley, chopped small
1 garlic clove, minced
1/4 teaspoon garlic powder
Salt & pepper to taste
Approx 1 tbs coconut oil or rice bran oil


Directions:
Mix garlic, garlic powder and parsley together and mix with chicken to marinate the chicken. Put in the fridge covered for about an hour to marinate
When it is ready, take out the chicken and coat in the coconut flour. I just put the flour on a plate and press the chicken into it
Then dip the chicken into the whisked eggs
Then coat the chicken with almond meal or LSA

Heat a frypan on medium to high and add oil of choice to pan, just enough to coat the bottom of the pan - about a tablespoon
When the oil is warm enough (you can test by putting the end of the chicken in to see if it starts to sizzle) add the chicken in and cook for approximately 2 minutes on each side or until golden
Once cooked, place on paper towel to help drain any oil
Serve with salad and a squeeze of lemon


Delish! Easy, Paleo friendly, kid friendly meal :)

Bee xx

Tuesday, 19 November 2013

RECIPE | Easy Peasy Bacon & Egg “Cupcakes” (Paleo, Gluten-Free)

These are a great little snack for a paleo pre-dinner party or it is great to make a bunch of them and keep them in the fridge for your lunch at work throughout the week. You can re-heat them in the grill or microwave. I’ve kept them in the fridge for days and they’ve been just as yummy as they were to begin with.

I first saw this on Sarah Wilsons site here and thought what a great idea!


Ingredients:
As much bacon as you like, rind removed (I used about 4 long rashers to make 6)
As many organic eggs as you like (I used 6)
A handful of whichever herbs you like, chopped… Chives, parsley, oregano would all be very nice
A few shavings of parmesan cheese if you want to
Rock Salt


Directions:
Pre-heat oven to 190’c
Line a muffin tin with baking paper or grease the tin
Line each hole with bacon
Crack an egg into each one
Top with herbs and sprinkle of rock salt. I also topped mine with cayenne pepper
Cook for around 15 minutes or until egg is set
Line a flat tray with baking paper
Turn out you bacon and eggs onto flat tin to cook the underside of the bacon
Cook for a few minutes
Once cooked, top with a little parmesan cheese and serve

Have you tried any other variation to these? I bet they would be delicious with some chopped tomato or olives on top!

Bee xx

Friday, 15 November 2013

Kale Chips! A great way to get your kids to eat kale!

My son eats well most of the time but getting him to eat kale was a struggle until..enter.. kale chips.... 


He gets so excited now when he sees kale and practically begs me to make kale chips for him.

If you haven't tried them, it is worth giving them a go. They are very easy, delicious & nutritious! They make a great snack for the kids or side dish for the adults.

You can experiment with different spices. I usually use cumin & coriander seeds to sprinkle over the top.

Ingredients:
Kale (shock horror)
Tiny pinch of rock salt
Tiny amount of olive oil

Directions:
Pre-heat oven to 200'c
Line baking with baking paper
Mix the kale, salt, oil and any other spices together and spread out over baking tray.
Bake for around 15 minutes until kale turns slightly browned (some parts will go darker) and super crunchy


Enjoy!

Bee xx

Wednesday, 13 November 2013

RECIPE | The Pizza Omelette (Pumpkin, Tomato & Parmesan) - Paleo

This is such a great, throw whatever you have left over in the mix kind of meal. Very filling, can be made for one or more people... 


I have listed what I used but you can throw in anything, you could add cheese or ham or any other vegetable, the possibilities are endless :)

Ingredients:
2 eggs whisked
About 200gm diced & roasted pumpkin
1 tomato, roughly chopped
Half a red onion, diced
4-5 big tablespoons home-made pasta sauce
A small handful of chopped mixed herbs, I used fresh basil, parsley & oregano - from my garden of course :)
A little parmesan to shave over the top
Pinch of rock salt 
1 tablespoon olive oil

Directions:
Heat olive oil in small pan
Add onion and cook on medium for 2 minutes
Add tomato & salt and cook for another minute
Add pumpkin and sauce and let simmer for a minute
Add whisked eggs and half of the herbs 
Cover with lid and cook until egg fluffs up and is firm
Tip on to plate, top with remaining herbs and shaved parmesan

Bellissima! Pizza Omelette :)

Enjoy!

Bee xx


Tuesday, 12 November 2013

RECIPE | The Ultimate Chocolate Milkshake! (Dairy Free, Low Fodmap)

Last night, I came home from a Bikram Yoga class late, hungry, thirsty and craving chocolate BADLY!

So what's a girl to do? Why make a chocolate milkshake of course!

This chocolate milkshake is like no other that I have ever tasted, it is so delicious and replenishing, especially after a work out. 

It feels so indulgent but it is packed full of nutritious super-foods!

Ingredients:
1 1/2 cups milk of choice (I used a mix of organic almond & coconut milk)
1 tablespoon raw organic cacao
Half an avocado
1 banana
Handful of berries (whatever you have, I used blueberries & raspberries)
Half a teaspoon maca powder
1 teaspoon vanilla bean paste
1 tablespoon maple syrup
1 cup of ice

Blend all ingredients together and top with a few more frozen raspberries.

This would serve 2 people but I was being a piggy and drank the whole thing! Mmmmm.....

Enjoy!

Bee xx

Thursday, 7 November 2013

RECIPE | Bananarama Energy Smoothie

This is one of the yummiest, easiest & most energising smoothies ever. It is completely satiating so will keep you full for hours!

The recipe below makes enough for 2 people (or you can make one now and have some later for afternoon tea, it keeps well in the fridge just give it a quick shake before drinking).


Ingredients:
2 medium sized ripe bananas
1 big teaspoon almond butter
1 big teaspoon maca powder
1 big teaspoon raw honey
1 1/2 cups almond milk or milk of choice
1 teaspoon cinnamon
1 tablespoon coconut oil
1 teaspoon vanilla paste
1/2 cup of ice


Directions:
Put all ingredients into blender, blend for a minute or until all mixed together.

Enjoy!

Bee xx

Monday, 28 October 2013

RECIPE | Banana Bread (Paleo, Grain Free, Dairy Free, Sugar Free) - Delicious!

This banana bread is a must try for all banana bread lovers. It looks just like 'real' banana bread. It is moist & delicious just how any good banana bread should be although it contains no grains, no dairy and no refined sugar. It is delicious recipe for paleo eaters :) I have been given the tick of approval by hubby and friends that this is a much nicer, lighter version of the heavy bread found elsewhere.


I embarked on a paleo lifestyle a few weeks ago and ever since I have longed for a slice of banana bread! Mainly because I couldn't eat it I am sure! I am glad I had the craving because this led me to three weekends of perfecting this delicious banana bread recipe. After trial and error I am so happy with the result! I am actually eating a slice now with a cup of tea!

Ingredients:
3 medium bananas, mashed very well
2 tablespoons desiccated coconut
1 cup tinned coconut milk
2 tablespoons shredded coconut
2 tablespoons melted coconut oil
2 tablespoons raw honey 
2 teaspoons vanilla bean paste
3 eggs
2 teaspoons baking soda
1 cup almond meal
3/4 cup coconut flour 
1 teaspoon cinnamon
pinch of salt 
A few almonds or whatever you have handy to sprinkle on top


Directions:
Pre-heat oven to 180'c
Grease & line loaf tin
Whisk bananas, vanilla, eggs, honey & coconut milk together 
Add almond meal, coconut flour, shredded coconut, cinnamon, baking soda & salt, whisk until combined breaking up any clumps with the whisk
Mix through the melted coconut oil
Whisk all for approx 1 minute until it reaches a smooth(ish) consistency
Pour into prepared loaf tin & bake for 1 hour - 1 hour 15 mins - until skewer comes out clean

Half way through you may need to cover the top loosely with foil to stop it browning.

Voila! Yummy banana bread to kill the cravings without any guilt :) You can serve with some butter or honey (or both) or it is lovely on it's own.


Enjoy!

Bee xx

Just a note on the ingredients, everything listed can be found at health food stores but I also have seen everything a large supermarkets. I found Bob's Mill Organic Coconut Flour at Coles so these things aren't hard to find :)


Thursday, 24 October 2013

HOW TO | Kombucha

SCOBY DOBY DOO! Let’s get Kombucha making!

Making anything from scratch is so rewarding. Kombucha is no exception. The first taste of your first fizzy batch of kombucha will make you so proud!

It is a very easy process. The key is getting the balance right of sweetness & tart. You don’t want it to taste too sweet because that means it hasn’t been fermenting long enough and there is too much sugar in it still and you don’t want it too tart because it won’t be palatable. I personally find that 7 days is generally a good amount of time for the amount I make (3 litres) to ferment.

This week it has been really warm weather so I only needed it to brew for 6 days… Other times when it was really cold in winter I left it for 10 or so days. You will get the hang of it and how you like it. Another way I can tell if mine is ready is by the thickness of the new SCOBY that forms on top of the mother SCOBY. 
 
What the heck is a SCOBY you ask? It is the white ugly looking thing that forms on top of the fermented tea - Symbiotic Culture/ Colony of Bacteria & Yeast. Some people refer to it as the ‘mushroom’ or the ‘mother’’. You can see it formed my photo at the top of this page.


Once you have the first part of the fermentation down pat (meaning you know how long to brew it for to suit your tastes) you can start experimenting with different flavours & extra carbonation. This is called the ‘second fermentation’. I have made ginger flavour, berry flavour and am currently experimenting with apple flavour. So far I love the berry flavour, as does my son. It is easy to do; you literally just add pieces of what you like to the Kombucha in an airtight flip lock bottle and allow it to ferment for a few days which creates extra carbonation (caused by the sugar in the fruit and the compression of the bottle/ lack of oxygen). It is never going to be fizzy like a bottle of coke because that is forced carbonation. This is natural carbonation so once you get used to it you will be surprised at just how bubbly you can make it! Again, this is trial and error. Be careful because I have heard that the bottle tops can pop off or the bottles can explode from all of the carbonation. I have never experienced this myself though. Because I have been worried about it happening, I always store my bottles in a cooler bag in the laundry so if they do explode they will just explode in the bag and cause no damage.

 
To get started you will need a SCOBY and some starter liquid. I have heard of people making their own SCOBY’s from raw Kombucha they have bought. You will find more information on that on the links provided below. I got my SCOBY from my yoga teacher. If you know someone that brews their own Kombucha they will most likely have a spare SCOBY to give away as they are constantly multiplying. Otherwise you can buy them online. The links below have a source for online SCOBY's.

Here are some great sites with useful information if you would like to read. They also have recipes for making Kombucha.

http://www.culturesforhealth.com/make-kombucha

This is what I do exactly..

What you will need:
Big wide mouthed jar (a big biscuit jar is ok)
An elastic band
One or two pieces of paper towel

Ingredients:
6 tea bags (Green Tea, White Tea or English Breakfast Tea)
1 cup plain white sugar, castor sugar or raw cane sugar (I find white sugar works best)
3 litres of filtered water
1 cup starter liquid & a SCOBY

Method:
I use 3 organic Green tea and 3 organic English breakfast tea bags (you can't use flavoured tea only, the oil in the tea ruins the SCOBY although one or two bags for flavour should be fine).

Boil 3 litres of water in a big pot.
Once boiled, add tea bags and leave to brew for 5-10mins
Take them out, stir in 1 cup plain white sugar and let it dissolve (remember the SCOBY lives off the sugar, so the end product actually has very little sugar in it)
Take off the heat, let it come to room temperature
Pour into brewing vessel (big glass jar with wide neck)
Pour SCOBY and starter liquid on top (it will start to float after a couple of hours)
Cover glass jar with a piece or two of paper towel and secure with rubber band (make sure there is no room for bugs to crawl in)
Keep in well-ventilated area (I store mine in the laundry), away from direct sunlight
Keep for 7-10 days. Taste along the way. The longer you leave it the more tart it will become

I then do the second fermentation but you don't have to, you can just drink it now :)

 
Second fermentation goes like this:
Get a few airtight flip lock bottles, wash out and dry.
Pour kombucha into bottles, add a few pieces of fruit if you like then top up until it reaches 1cm to top of bottle. Close and store in cooler bag for a few days before transferring to fridge.

NOTES ON CLEANING THE JARS – Do NOT use antibacterial soap or hand soap when touching the SCOBY or cleaning out the jar, it will kill the SCOBY. Just wash it out with warm soapy dishwashing liquid or white vinegar and dry thoroughly. I also pour boiling water all over the jar when I am cleaning it. I keep refilling my jar without washing it out for about 3-4 brews, then I clean it out and start again.

Let me know how you go.

Happy brewing!!!

Bee xx


Saturday, 12 October 2013

RECIPE | Raw Chocolate Fudge Tart with Salted Chocolate Sauce Icing (Dairy Free, Gluten Free)

Ok all you chocoholics, this one is for you!

This makes 16 squares of chocolate fudge tart goodness. You can easily double the recipe if you need to for a larger group.

I took this to my father in laws last night where they don't really embrace healthy eating so I didn't tell them it was a healthy raw dessert. They thought they were eating a naughty chocolate brownie full of flour, butter and sugar... mwahahahahaha (best evil laugh), little did they know they were getting loaded full of good stuff!

Raw Chocolate Fudge Tart Ingredients:
2 1/2 cups almonds
1/3 cup raw organic cacao powder
1 tablespoon tahini paste (I used unhulled, you can use either)
1 1/2 tablespoons creamed coconut (similar to coconut oil if you can't find creamed coconut, don't confused with coconut cream! Creamed coconut has a much stronger coconut flavour)
2 tablespoons 100% pure maple syrup (not the fake stuff)
6 medijool dates
1/4 cup filtered water (more if you need it)

Salted Chocolate Sauce Ingredients:
2 tablespoons creamed coconut (or coconut oil)
2 tablespoons 100% pure maple syrup 
1 tablespoon raw cacao powder
1/4  teaspoon Himalayan pink rock salt
A little touch of water


Tart Directions:
Line square tin with baking paper
Blitz almonds in food processor until they resemble breadcrumbs
Add dates and blitz again until combined 
Add cacao, tahini paste, creamed coconut and blitz again until combined
Add water, you may need a little more or a little less it will start to resemble a fudgy (yes fudgy is a word) texture


Once all is combined and you are happy with the texture, scoop the mixture and spread evenly in to prepared tin
Put it in the freezer for 20mins

Sauce Directions:
Put all ingredients in small sauce pan on the lowest heat 
Whisk together, you may like to add a little water
Remove from heat once combined

Take the tart out of the freezer and pour the sauce all over the top. You can top with raw cacao, almonds, coconut... anything you like!

Put it all back in the freezer for another 30 mins to set.


Take it out, cut into squares and serve. 

Best kept refrigerated.


Enjoy!

Bee xx

Sunday, 6 October 2013

RECIPE | Overnight Soaked - Brekky in a Jar

There is something about eating out of a jar that just makes it all the more special to eat.. No idea why, I guess it is just the novelty factor. When I am in need of a super energising brekky which is a bit more filling than a smoothie, I always opt for a "Brekky in a Jar". 

The possibilities are endless with what you can put in these jars, but here are a couple of my favourites :)

Overnight Soaked Chia & Oats Brekky in a Jar

Ingredients:
1 tablespoon chia seeds
Half cup rolled oats
3/4 cup milk of choice (I am loving coconut milk at the moment)
Handful of frozen blueberries
1 tablespoon of dessicated coconut
2 teaspoons maple syrup 

Directions:
Mix together chia seeds with oats and stir in milk
Allow to sit on bench for 10 minutes 
Stir again to ensure the chia soaks up all the milk properly (otherwise it goes clumpy)
Put in fridge over night

In the morning you can layer your brekky in a jar. I layer all of the ingredients and add a little maple syrup over the coconut. I like to put frozen blueberries on top so by the time I get to work they are defrosted and the juice runs through the other ingredients :)


Overnight Soaked Chocolate Chia & Raspberry Brekky in a Jar


Ingredients:
2 tablespoon chia seeds
1 cup milk of choice (I am loving coconut milk at the moment)
Handful of frozen raspberries
Handful of slivered almonds
2 teaspoons raw cacao
2 teaspoons maple syrup 

Directions:
Mix together chia seeds with cacao and stir in milk
Allow to sit on bench for 10 minutes 
Stir again to ensure the chia soaks up all the milk properly (otherwise it goes clumpy)
Put in fridge over night

In the morning you can layer your brekky in a jar. I layered all of the ingredients and added some loving earth chocolate buckinis on top.. You could just add extra almonds or other nuts, it is nice for some extra crunch!

Enjoy!

Bee xx